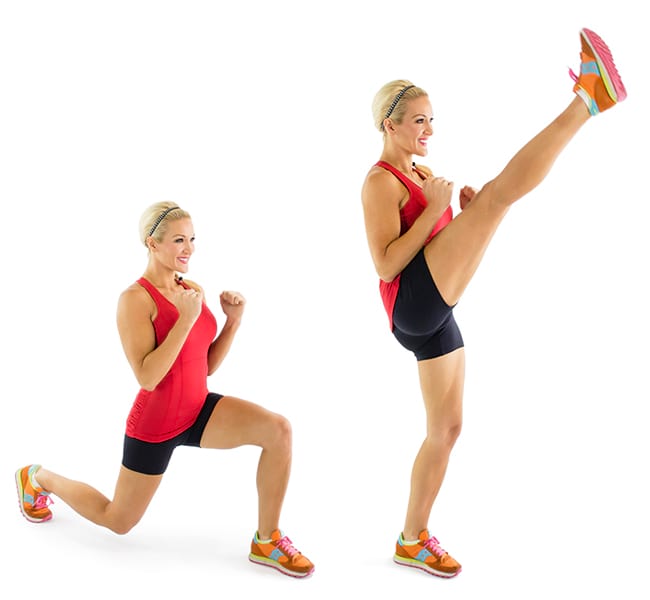
Today we are going to cover another calisthenics (bodyweight) exercise called the Lunge Kick.
Before using this exercise, you should have some practice with the two different movements that make up this activity.
The two separate actions are the lunge and the high kick.
Spend some time practicing both, and when you feel that you have got your technique down, then you can combine them.
When you are first starting with this exercise, you should only kick as high as what feels comfortable. Over time with practice, the height you can kick your leg up should slowly increase.
If you kick too high without having the required flexibility, there is a greater chance of pulling muscles in your lower body.
Over time your goal is to be able to perform the kick portion so that your foot in inline with your head.
It may take awhile before you get the required flexibility but just keep at it.
How To Do The Lunge Kicks Exercise
Video Demonstration
Image Example

Written Description
- Step 1: Stand straight up and tighten your core muscles. Keep you back flat, and the shoulders pulled down and back. Look straight ahead. You are now in the starting position.
- Step 2: Take a step backward by bending at your hips and knees. Lower your body until your back legs knee is almost touching the ground and pause at the bottom position. Make sure you keep your knee in line with your foot and your back straight.
- Step 3: Drive through the heel of your front leg by extending at your knee and hips.
- Step 4: As you are rising swing your back leg forwards into a front kick. You can make the kick portion harder by attempting to touch your toe with the hand on the opposite side of the leg kicked.
- Step 5: Return your leg back to the ground to come back to the starting position. Congratulations you have now completed one repetition of the Lunge Kick.
You can do all repetitions on one side completely and switch, or you can alternate your legs with every kick.
Tip
Do not allow your front legs knee to go past your toe.
Muscles Worked
The primary muscles that this exercise uses are your Quadriceps, Hip Flexors, and your Glutes.
The secondary muscles that get worked by the Lung Kick are your Hamstrings, Abdominals, and the calves.
Variations of the Kick Lunge Exercise
There are two variations of the lunge you can use when you are doing this exercise.
These are the regular lunge where you step forwards. The other is the reverse lunge. Instead of taking a step forwards you will move your foot behind you.
I recommend using the reverse lunge for two reasons.
The first is for your balance. When people perform the forward stepping lunge, they tend to lean forward. By stepping backward, their back tends to remain more straight throughout the movement.
The second reason has to do with keeping your knee behind the toe. When your knee passes your toe, there will be extra stress placed on your knee joint.
This increased stress will increase your chance of a knee injury much higher.
Stepping backward (reverse lunge) when you are lowering your body will help you to keep your back straight. Keeping a straight back will decrease the chance of your front legs knee going past your toe.
Benefits of Lunge Kicks
The exercise will help you to improve the muscular strength in your lower body.
If you spend all day sitting in front of a desk, it is common for your hip flexors to shorten and become weaker. Weak hip flexors increase your chances of injury and cause back pain for many people.
The Lunge kick will stretch your hip flexors and your quadriceps with each repetition you perform.
The stretching will help to lengthen and strengthen your hip flexors. The stretching and strengthening will contribute to lowering the chance of you having a back injury.
You will improve your balance by using this movement. If you find you are wobbling when you do this exercise keep practicing.
Inclosing
Over time you will gain the necessary balance and will get less wobbling every time you perform Lunge Kicks. Eventually, with practice, you will have the necessary stability and no wobbling at all.
Focus on improving the number of repetitions or the active time you are performing the exercise for from week to week.
I like to use this exercise with interval training. We offer a Free Online Interval Timer that you can use. No registration is required to use the tool so check it out.
If you do decide to give it a try, each week either increase the amount of time you are performing the exercise (Active Time) and keep the rest time the same each week. Alternatively, you can increase the number of rounds(sets) that you will perform each week.
Leave a comment and let us know what you thought of this exercise. Is there anything else you feel we should have added?
You may also like
All About Bulgarian Split Squat Jumps Exercise
Lunge Split Jumps Exercise
All About Split Lunges
Tuck Jump Burpees Your How To Guide
Looking to gain more strength or lose some weight? We offer free fitness tools to help you reach your fitness goals. Register for free while we are in beta and get free lifetime access to our fitness tools that include an easy to use Calorie Counter, High-Intensity Interval Timer, Multiple Fitness Calculators and our Exercise Logger.